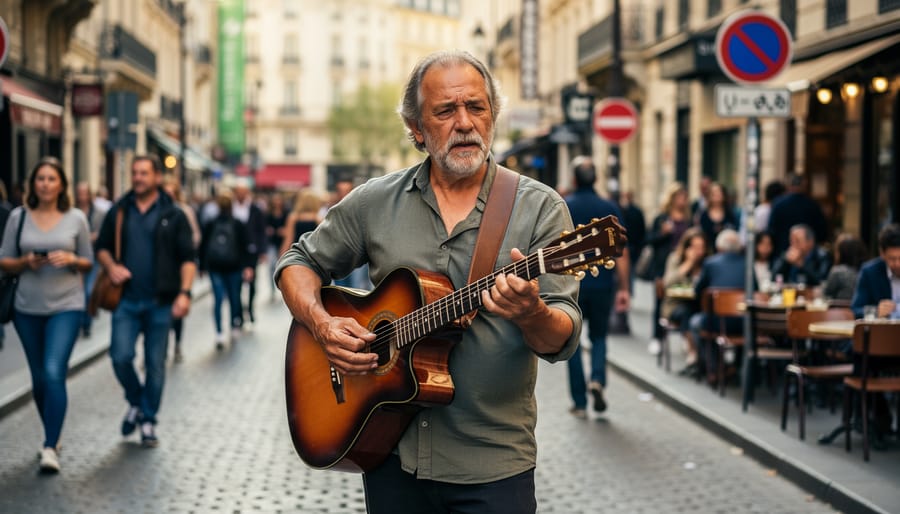
Environmental portraiture places your subject in their meaningful surroundings to tell a richer story than a studio backdrop ever could. This technique captures not only the person but the context that defines them: a chef in their bustling kitchen, a musician surrounded by instruments, a craftsperson in their workshop. The core method combines deliberate compositional balance between subject and setting with lighting that illuminates both elements cohesively, typically requiring an hour of location scouting and setup before you ever fire the shutter.
The challenge that stops most photographers isn’t technical execution. It’s learning to see environment as character rather than backdrop. You need to identify which contextual elements strengthen your subject’s narrative and which simply create clutter. A portrait of an architect gains depth when framed against blueprints and building models, but loses focus if the background becomes an indistinct office jumble.
Success in environmental portraiture depends on mastering three interconnected skills: reading ambient light to determine whether you’ll supplement or overpower it, positioning your subject where environment and person create visual harmony rather than competition, and choosing focal lengths that include meaningful context without diminishing your subject’s presence in the frame. Wide-angle lenses between 24mm and 50mm typically serve this genre best, allowing you to capture substantial environmental detail while keeping your subject prominent.
This guide walks you through the complete workflow, from pre-shoot location assessment through final image verification, with specific attention to the gear choices and shooting techniques that separate compelling environmental portraits from snapshots with busy backgrounds.
What You Need: Gear and Preparation for Environmental Portraits
You’ll need thoughtful gear choices and advance preparation to create environmental portraits that authentically represent both subject and place. The equipment list isn’t extensive, but selecting the right tools makes the difference between a portrait that simply includes a background and one that weaves person and environment into a unified story.
Start with a camera body that handles varied lighting conditions well. When you’re what to look for in a camera for this work, prioritize good dynamic range and low-light performance, you’ll often balance bright windows with dim interiors or manage uneven outdoor light. Most modern DSLR and mirrorless cameras handle these challenges capably, with full-frame sensors offering an edge in demanding conditions.
Your lens selection shapes how much environment appears alongside your subject. For environmental portraits, wider focal lengths for context work beautifully, the 24mm to 85mm range captures enough setting to tell the story without distorting your subject. A 35mm prime provides a natural perspective that includes meaningful context, while a 50mm balances environment with a more intimate feel. An 85mm works when you want slightly more subject emphasis but still need visible surroundings. A versatile zoom like a 24-70mm gives you compositional flexibility without changing lenses.
Essential gear for environmental portrait work includes:
- Camera body with strong dynamic range and reliable autofocus
- Versatile lenses in the 24-85mm range (35mm and 50mm primes are workhorses)
- Collapsible reflector for filling shadows with natural light
- Sturdy tripod for stability in dim conditions
- Spare batteries and memory cards for extended location sessions
Optional lighting tools expand your creative options. A small speedlight with a bounce card or portable LED panel helps balance exposure when ambient light falls short, though many environmental portraits succeed with natural light alone. Keep lighting gear minimal and portable, you’re working in real locations, not controlled studios.
Preparation matters as much as equipment. Research your subject beforehand through conversation or quick interviews to understand what environment genuinely represents them. Scout potential locations in advance, visiting at the time of day you plan to shoot to assess natural light quality and identify compositional elements. Notice distracting backgrounds, cluttered areas that need tidying, and spots where subject and setting harmonize naturally. This groundwork lets you work efficiently when your subject arrives, spending shooting time on connection and storytelling rather than scrambling to solve technical problems.
Important Considerations Before You Shoot
Before you frame your first environmental portrait, take time to address several critical safety and ethical considerations that will protect both you and your subject.
Start by researching location permissions well in advance. Private businesses, historical sites, and even some public spaces require formal permits for photography sessions. Contact property managers or local authorities to clarify what’s allowed. Industrial settings present particular risks, abandoned buildings may have structural hazards, active facilities require safety clearances, and trespassing carries legal consequences regardless of your artistic intent.
Subject privacy and dignity must guide every decision. Discuss your vision openly with your subject before the shoot and respect their comfort level with how they’ll be portrayed. Environmental portraits often reveal personal details about someone’s life or work, so ensure they understand how images will be used. Secure proper model release requirements in writing, especially for commercial use.
Challenging lighting conditions create both technical and safety concerns. Shooting in dim warehouses, bright midday sun, or near reflective surfaces can strain your vision and affect judgment. Bring a headlamp for dark spaces, stay hydrated in hot outdoor environments, and watch for trip hazards when you’re focused through the viewfinder.
Protect your camera gear by assessing environmental risks beforehand. Dusty workshops, humid outdoor locations, and unpredictable weather demand appropriate protection. Carry lens cloths, rain covers, and extra batteries. When shooting near water or in sandy areas, exercise extra caution with equipment changes to prevent damage that could end your session prematurely.
Step-by-Step: Creating Compelling Environmental Portraits
Step 1: Choose Your Theme and Subject Focus
The foundation of a compelling environmental portrait begins with discovering the story that connects your subject to their space. Start by having a genuine conversation with the person you plan to photograph. Ask about their daily routines, passions, and what places hold significance in their life. A chef might immediately suggest their restaurant kitchen, but deeper discussion could reveal a home garden where they grow heirloom vegetables, offering a more personal narrative.
Consider three primary theme categories: occupation (where someone works and what they do), passion (hobbies or creative pursuits that define them), and lifestyle (daily environments that shape their identity). A musician could be photographed on stage, in their cluttered practice space, or at the neighborhood record shop they frequent. Each choice tells a different story.
Interview your subject about specific memories tied to potential locations. A woodworker might describe the afternoon light hitting their workbench just right, or a teacher might recall a favorite corner of their classroom. These details help you identify settings with authentic emotional resonance rather than generic backdrops.
Document your conversation notes and sketch rough composition ideas. Define the core narrative you want viewers to understand at a glance. Are you showing mastery of a craft, quiet dedication, creative chaos, or connection to heritage? This clarity prevents the environment from becoming mere decoration and ensures every element in your frame serves the story.
Step 2: Scout and Plan Your Location Setup
Visit your chosen location at least twice before the shoot, once during your planned shooting time and once at a different hour to compare how light transforms the space. Morning sun streaming through factory windows creates entirely different shadows and mood than late afternoon glow, and you need to see both to make an informed decision. Bring your camera on these scouts to test exposures and identify potential problems you won’t notice with just your eyes.
Walk the entire space looking for distracting elements that will pull attention from your subject: bright exit signs, cluttered shelves, power lines cutting across the frame, or busy patterns that compete visually. You can’t always eliminate these, but knowing where they are lets you plan angles that minimize their impact. Look for natural framing elements instead, doorways, archways, tree branches, or architectural lines that can direct the viewer’s eye toward where your subject will stand.
Mark two or three specific positions where you’ll place your subject, considering both the background story and the light quality at each spot. A mechanic makes sense positioned near their tools with a workbench visible behind them; a baker belongs with ovens or flour-dusted surfaces in view. Test these positions by photographing a stand-in or even a jacket draped over a chair to preview the composition and background relationship.
Note the exact time good light hits each position and plan your shooting schedule around these windows, not your convenience.

Step 3: Work with Natural or Available Light
Natural light preserves the authentic atmosphere of your chosen environment and helps tell a genuine story. Before you shoot, walk the location at the same time you plan to photograph. Notice where light falls, how it moves through the space, and what shadows it creates. This reconnaissance reveals whether you’re working with hard midday sun, soft overcast light, warm golden hour glow, or the directional quality of window light streaming into an interior.
Window light ranks among the most versatile sources for indoor environmental portraits. Position your subject near the window at an angle rather than facing it head-on, which prevents flat lighting and adds dimension. The surrounding room becomes visible while the subject receives beautiful, directional illumination. For outdoor shoots, open shade under a building overhang or tree canopy provides even, flattering light that won’t create harsh shadows across your subject’s face while keeping the background visible and properly exposed.
Ambient interior lighting requires careful assessment. Overhead fluorescents may cast unflattering shadows, but they establish workplace authenticity. Workshop spaces with large skylights offer diffused natural light that balances subject and environment beautifully. When existing light proves insufficient, supplement subtly with a reflector to bounce light into shadow areas rather than introducing artificial sources that might overpower the environmental mood.
Time your shoot around the sun’s position. Early morning and late afternoon provide warm, directional light that adds depth. Overcast days deliver consistent, soft light that simplifies exposure balancing between subject and setting.

Step 4: Shape Lighting and Composition
Now refine the technical elements to make your environmental portrait sing. Start by positioning your subject relative to your main light source, typically 45 degrees from the light creates dimensionality without harsh shadows. If you’re working with window light, place your subject a few feet back from the window rather than directly against it; this softens the light and gives you room to balance them with the background.
Use a reflector to lift shadows on the side of your subject opposite the light source. A simple white or silver reflector bounces light into darker areas without overpowering the natural feel. Position it close enough to fill shadows but not so close that it creates a second competing light source. In outdoor settings, a large white foam board works brilliantly and costs almost nothing.
Balance your subject’s exposure with the background by adjusting your camera settings carefully. Meter for your subject’s face, then check if the background is too bright or too dark. If the environment is blowing out, reduce your ISO or shutter speed slightly. If it’s too dim, open your aperture one stop or add subtle fill light rather than letting the setting go completely black.
Apply composition rules to integrate person and place. Position your subject at a rule-of-thirds intersection rather than dead center. Use leading lines in the environment, a workbench edge, a hallway, a fence line, to draw the eye toward your subject. Frame them naturally using doorways, windows, or environmental elements that reinforce context without obscuring their face. The composition should feel intentional, not accidental.

Step 5: Direct Your Subject and Shoot
With your location ready and lighting refined, shift your attention to your subject. Start by explaining what you’re trying to capture and why this particular environment matters to their story. This conversation puts them at ease and helps them understand their role in the frame rather than feeling like a prop in front of a backdrop.
Guide your subject into positions that naturally interact with the setting. If you’re photographing a chef in their kitchen, have them prep ingredients at the counter or check something in the oven rather than standing stiffly beside the stove. A mechanic might lean against a workbench or hold a familiar tool. The goal is action or stance that feels authentic to the space, not forced posing.
Shoot both posed moments and candid reactions. Direct a specific position, take a few frames, then keep shooting as they relax between poses or respond to your conversation. These in-between moments often reveal genuine expression and body language that planned poses miss. Capture tight compositions that emphasize facial expression alongside wider shots that show more environmental context.
For camera settings, use apertures between f/4 and f/8 to maintain sharpness on both your subject and key background elements. Too shallow a depth of field isolates the person but loses environmental detail; too deep can make busy backgrounds compete for attention. Adjust based on how much setting your story needs, f/4 for subtle context, f/8 when the environment carries equal narrative weight.
Shoot variations from different angles within the same setup, changing your distance and perspective while your subject maintains their activity or position.
Step 6: Review and Adjust On Location
Chimping, reviewing your shots on location, isn’t just acceptable for environmental portraits, it’s essential. Your LCD screen reveals exposure balance issues you can’t judge through the viewfinder alone. Check that your subject’s face is properly exposed while the background remains legible and contextual, not blown out or crushed to black.
Zoom in on your images to verify critical details: Are your subject’s eyes sharp? Does the environment add meaningful context or create distracting clutter? Evaluate whether the composition guides the viewer’s eye naturally from subject to setting and back again.
Don’t wait until you’re home to discover your lighting created harsh shadows that obscure your subject’s expression, or that a cluttered shelf behind them undermines the story. Make adjustments immediately: shift your subject two feet left into better light, remove a distracting object from the frame, or change your angle to include more environmental context.
Take a moment between sequences to assess storytelling impact. Does this image reveal something authentic about your subject’s relationship to this place? If the answer isn’t immediately yes, adjust your approach before the light changes or your subject tires.
Post-Production: Enhancing Your Environmental Portraits
Post-production gives you the chance to refine your environmental portrait while preserving the authentic connection between subject and setting. Start by evaluating overall exposure balance, your subject should be clearly visible without being artificially bright compared to their surroundings. Use global adjustments first: correct white balance to match the location’s natural lighting, then adjust exposure and contrast to bring both person and place into harmony. If your subject is slightly underexposed relative to the background, lift shadows selectively rather than brightening the entire image.
Color grading plays a critical role in maintaining environmental authenticity. The tones and hues should reflect the actual character of the location, warm industrial light for a workshop setting, cool natural tones for outdoor environments, or the specific palette of a studio or workspace. Avoid applying trendy presets that drastically shift colors away from reality. Instead, make subtle adjustments to saturation and tone curves that enhance the existing mood without creating an artificial look.
Selective adjustments help direct attention without sacrificing context. Use local adjustment tools to slightly brighten your subject’s face or add clarity to their eyes, but keep these changes subtle enough that they don’t stand out. Similarly, you can gently reduce distractions in the background through targeted exposure or saturation adjustments, though the environment should remain recognizable and true to life.
The biggest risk in post-production is over-processing. Heavy-handed skin smoothing, excessive sharpening, or dramatic vignettes can make your subject look pasted into their environment rather than naturally part of it. Step away from your screen periodically and return with fresh eyes. If any element looks noticeably artificial or your subject appears separated from their setting, pull back your adjustments until the image feels cohesive again.
How to Know You’ve Captured a Strong Environmental Portrait
A strong environmental portrait succeeds when subject and setting work together to tell a complete story. Rather than simply featuring a person in a location, the image should reveal something meaningful about who they are through where they’re photographed. You’ll know you’ve achieved this when viewers immediately understand the connection between person and place without needing explanation.
Use this checklist to evaluate your environmental portraits:
- The environment provides meaningful context that reveals something about the subject’s profession, passion, or personality rather than serving as generic background
- Both subject and setting remain clearly visible with balanced exposure, neither dominates to the point where the other becomes unreadable or lost
- Composition guides the viewer’s eye naturally from subject to environment and back, using leading lines, framing, or strategic placement rather than creating visual confusion
- Lighting feels authentic to the location and enhances the environmental mood without looking obviously artificial or disconnected from the space
- The complete image communicates a narrative that goes beyond a simple headshot, inviting viewers to learn about the subject through their surroundings
Ask yourself whether someone unfamiliar with your subject would gain insight into their life, work, or character just from viewing the photograph. If the environment could be swapped without changing the story, it’s likely serving as mere backdrop rather than integral context.
When reviewing your images, zoom in to check technical sharpness on the subject while also examining background detail. Step back and assess whether the overall composition creates visual harmony. As you polish your photos in post-production, maintain the authentic relationship between person and place you captured on location.
Keep shooting regularly in different environments to refine your eye for meaningful context. Each session builds your ability to recognize strong environmental portrait opportunities and execute them with greater confidence.
Common Questions About Environmental Portrait Photography
What focal length works best for environmental portraits?
A range between 35mm and 85mm typically delivers the most natural perspective, with 50mm being ideal for balanced compositions that show both subject and setting without distortion. Wider lenses (24-35mm) work well when you want to emphasize the environment, while 85mm creates tighter framing with softer background context.
How do I handle mixed lighting situations?
Expose for your subject first, then adjust to recover as much background detail as possible without blowing highlights or crushing shadows. Modern cameras with good dynamic range give you flexibility to balance exposures in post-production, or you can use a subtle fill light to bring your subject’s exposure closer to the ambient environment.
How much of the environment should I include in the frame?
Include enough context to tell the story without overwhelming your subject, who should remain the clear focal point. A good rule is to ensure the setting provides meaningful information about the person while keeping their face and expression clearly visible and engaging.
What’s the best time of day to shoot environmental portraits outdoors?
Golden hour (the hour after sunrise or before sunset) provides soft, directional light that flatters subjects while illuminating environments beautifully. Overcast days offer gentle, even lighting that works particularly well when you need consistent exposure between subject and background throughout your session.
When working with subjects who feel uncomfortable in front of the camera, start by shooting them engaged in a natural activity within their environment rather than posing them directly. This approach helps them relax and often produces more authentic expressions that stand out compared to stiff, self-conscious poses.
If you’re looking to develop your environmental portrait skills through structured learning, the International Portrait Workshop offers online classes starting June 6, 2026, with five weekly three-hour sessions on Saturdays at 5 PM GMT for 170 USD (PayPal accepted, fees included). Another option is Person and Place: The Environmental Portrait, a subject-focused online workshop with Brian Hilliard that runs for nine consecutive weeks. Both programs provide dedicated instruction specifically for this portrait genre, helping you refine techniques through guided practice and feedback.